Tuesday Tip: Rachel’s matchbox template

I love doing matchbox swaps. Altering and decorating the tiny boxes and filling them full of little treasures is always fun. Many people decorate real (pre-made cardboard) matchboxes that they purchase or collect for their matchboxes swaps. However, I prefer to make my matchboxes from scratch using heavy card stock. I find the handmade boxes easier to decorate and customize.
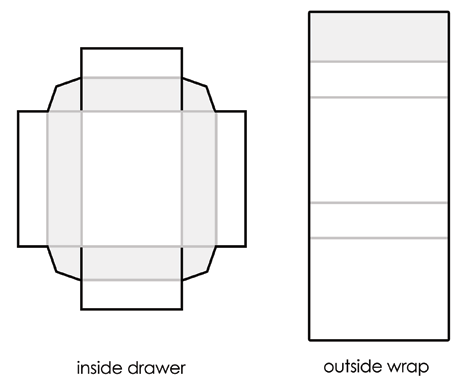
At the Swap-bot event on Sunday I passed out the template I created and use for making my matchboxes from scratch. It is very simple, but I thought others may be interested in using it. Here you can download a PDF version of my template. (Make sure to download the full-size document using the link below. Do not use the above .gif.) Matchboxes constructed using my template will be just slightly larger than a standard 32-count matchbox (approximately 1.5 x 2 x .5 inches). You can also print and then trace the template onto light cardboard, such as cereal box cardboard, if you prefer.
[
I love doing matchbox swaps. Altering and decorating the tiny boxes and filling them full of little treasures is always fun. Many people decorate real (pre-made cardboard) matchboxes that they purchase or collect for their matchboxes swaps. However, I prefer to make my matchboxes from scratch using heavy card stock. I find the handmade boxes easier to decorate and customize.
At the Swap-bot event on Sunday I passed out the template I created and use for making my matchboxes from scratch. It is very simple, but I thought others may be interested in using it. Here you can download a PDF version of my template. (Make sure to download the full-size document using the link below. Do not use the above .gif.) Matchboxes constructed using my template will be just slightly larger than a standard 32-count matchbox (approximately 1.5 x 2 x .5 inches). You can also print and then trace the template onto light cardboard, such as cereal box cardboard, if you prefer.
](http://blog.swap-bot.com/rachelmatchboxtemplate.pdf)
Instructions:
- Print out template on cardstock at 100%. Do not “fit to paper size” or your matchbox will not be the correct size.
- Cut along all black lines; score and fold along all grey lines.
- Apply glue to the light grey areas of the inside drawer.
- Fold the sides of the inside drawer in on themselves (they will be end up being double thick) while tucking the tabs into the folds of the shorter sides of the drawer.
- Fold the outside wrap around the inside drawer and glue it in place.
- Decorate your matchbox!
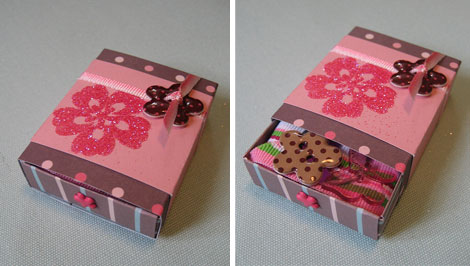
Your matchbox should end up looking something like this:


